

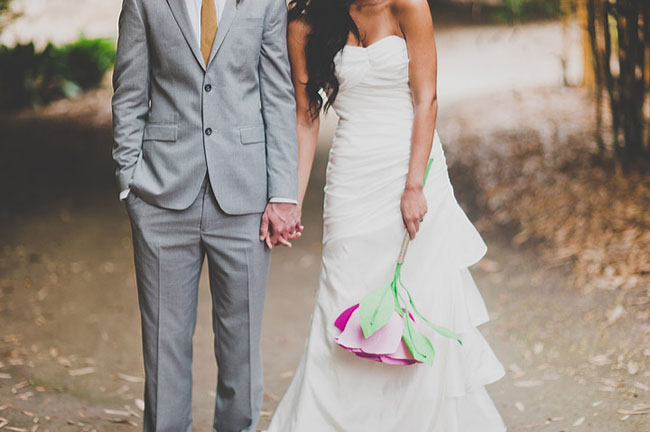
If you loved the beautiful DIY wedding this morning and Nata’s gorgeous paper flower bouquets, you are in luck as Nata is sharing how she crafted them with us! She was inspired by a template created by Morgan Levine on Martha Stewart (as was I in the flowers I created for this styled shoot). I just love that this basic idea has inspired different brides to create their own version of giant paper flowers – you might remember these equally awesome giant paper flowers from this wedding I shared last year. :) Thanks so much Nata for sharing how you created your giant pink paper rose + special thanks to Studio Castillero for the photos of the DIY + her wedding!

Materials (to make one giant rose)
- Roll of floral tape
- 6 18-gauge floral stem wire
- 4 sheets of Doublette crepe paper for petals (the doublette crepe sheets measure 10 x 49 inches)
- 1 sheet of Doublette crepe paper in green for leaves, calyx, stem
- 1 round pencil
- Craft Glue (we used this kind)
- Crepe paper templates (download from Martha Stewart)
- 3 copies of teardrop template
- 8 copies of the heart-shaped template
- 2 copies of the leaf template
- 1 copy of the calyx template
Step 1: Cut the petals

Cut 5-6 teardrop petals and 15-6 heart-shaped petals from the petal colored crepe paper.
IMPORTANT: Crepe paper is directional so it matters which way you’re cutting the paper. Make sure the grain is vertical when you’re cutting the flower pieces.

Stack 2 pieces of crepe paper on top of each other then place 1 copy of template over the crepe paper and staple. I don’t recommend cutting more than 2 layers of crepe paper at a time since the edges won’t be cut as cleanly.

Repeat until all of your petals are cut
Step 2: Cut the leaves + calyx
Cut 3 leaves and 1 calyx from the green crepe paper.
Step 3: Make the rose stem

Take 3 pieces of stem wire and wrap in floral tape.
Step 4: Shape the petals

With both hands, pull from the center of the petal outward. This will create a cupping of the paper (which is what gives it the petal-like quality)

Turn petal over and use the round pencil to curl the top of the petal.
Step 5: Create the rose bud – the inner part of the rose

Take one teardrop shaped petal and wrap around the taped floral wire from Step 3. Use more floral tape to secure. Repeat working your way around the floral wire until all of the teardrop shaped petals are use.
Step 6: Make the rose bloom –the outer part of the rose

Take one heart-shaped petal and wrap around the rose bud, secure with floral tape. Repeat until all petals have been used.
Step 7: Make the leaf-stems

Take 3 loose pieces of floral wire and using craft glue, wrap each one with green crepe paper. Take one leaf and 1 crepe paper wrapped floral wire from step 10 and glue together. Repeat 2 more times.
Step 8: Add calyx to rose

Wrap the calyx around the base of the rose bloom and secure with floral tape.

Cover the floral tape area with more crepe paper.
Step 9: Add leaf-stems to rose

Using craft glue, secure each of the 3 leaf-stems to the rose stem. I found it helpful to use binder clips to hold the stems together while the glue was drying.


And there you go! It might take a little time, but a great (and pretty awesome) alternative to real flowers for your bouquet – plus you can keep these forever!

big thanks to Studio Castillero for the photos + to reader Nata for the DIY created for GWS

This is gorgeous, love it!
These are so gorgeous!! What a genius idea…think that I may be getting busy with the scissors this evening :)!!
That’s pretty awesome!
I love this – those are so beautiful!!
So gorgeous! I’ll have to post it to my DIY Pinterest board so I remember to try it later on!
wow this is amazing! The rose looks so real~
These are amazing. I’m using paper flowers at my wedding. Such a great alternative.
I remember making these as a child! So fun to see it still being made and in a new (and bigger) way. Always love seeing DIY projects like this!
This is exactly my kind of DIY project. Brilliant!
I so love the idea of the bouquet.
The first time I saw this flower is looks like a real flower and I was amaze that it was a paper.
Love this!!! Does anyone know if ONE order of the doublette crepe paper from CASTLE in the AIR is enough to make ONE rose??
I was wondering the same thing. I wanted to order the paper online, and I wasn’t sure how many orders I would need for the petals. I will only be making one rose, so would one or two be enough?
Oh I love love love.
OH DOES THIS BRING BACK MEMORIES !! I was very broke one year ( more than one ) lol I had no money to buy x-mass gifts or decorations (newly divorced) one small boy I made these and put them on the tree, made bunches of them and gave as gifts ( the year was 1968 ) I think I need to make these again. Thanks for the memories
I have to be honest thats one of the best fake flower tutorials ive seen.
Congrats
I really love these!
I am getting married in 7 weeks and would love to use them as a bouquet, I get really bad hayfever so have ruled out real blooms…
I can not however find the crepe paper anywhere in the UK (In red or pale blue). I have had H2B scouring google but to no avail!
We are really on a tight budget and shipping is a bit ridiculous, anyone know where I might find it?
Thanks so much if you can help! xx
Holy awesome! These are amazing. Thanks for the great tutorial.
Wonderful tutorial. I linked you up in my blog in a posting about great paper flower tutorials. Thanks!
seriously FAB
Did anyone find out actually how much crepe paper one needs to order to make one rose? It says you need “four doublette crepe paper folds”. On the suggested supplier, does that mean you need to order four packs of the paper? These are stunning and can’t wait to make, but want to make sure I order enough.
so beautiful i love it
I would love to know the answer to that question too! :) I really want to try this, but don’t know how much double crepe paper to order from the supplier listed in the tutorial… anyone know???? thanks !!
I used regular crepe paper and used spray adhesive to double it, which worked brilliantly. I used one full length of Canson crepe paper for each layer and they measure 2.5 meters long and 0.50 meters wide. Judging by that it would seem 4 packs are required for each flower you wish to make.
I received a response back from ‘Castle in the Air’ regarding how much paper you need: instructions indicate you will need 4 sheets of the
doublette crepe for the petals, and 1 sheet of the doublette crepe for the
leaves. The doublette crepe is $2.50 per sheet and each sheet measures 10
x 49 inches. You can view our selection here:
https://www.castleintheair.biz/shoppe/?b=10&k=10&c=143
Thank you Castle in the Air for clearing this up :) Can’t wait to make one!!
Beautiful! Do you think this could be done with fabric too?
I love this! It’s definitely going in my bookmark.
I just mocked one of these up using printer paper, and I LOVE it! I’m going to use these for centerpieces in my July wedding. they look so beautiful in the pictures, too. Great craft idea!
These are just the right mix of cute and sophisticated!
I managed to get hold of a bulk order of crepe and was going to sell what I don’t need. So if you are in the UK and need some French Vanilla & Lemon Yellow, Peach & Light Rose or Golden Yellow & Melon I can help you out.
that’s so pretty!
Just perfect. Love, Love and bookmarking because I feel a wedding in the near future with my oldest.
OMG, this is gorge! Thanks for the tutorial. I may use this idea for my sister’s wedding! -askheatherg.net
featured this today at my blog!
I love this and I’m trying to make them for my wedding. Do you have more information on your BM’s flowers? e.i. how many sheet of paper did you buy for them? they are a little smaller correct? and the colors.. looks like it’s lighter at the tip.. did you use bleach?
thank you so much.
mandy
Mandy – thanks for the kind words! The BM flowers were a combination of things: 1) smaller version of crepe paper rose (just used less petals to make smaller) 2) tissue paper peonies and poppies – and bleached the paper to add some dimension (you’re good!) 3) crepe paper flower with bleached ends 4) white crepe paper ombre dyed pink with Rit fabric dye. If you’re dying your flowers, I used a mixture of 1 cup water and 3/4 cup bleach. The paper only needs to be dipped for like a second or two…the bleach moves quick. I never tried the bleach method with the roses since the bleach degrades elasticity of the crepe paper and you need the elasticity in tact for shaping the petal.
Need to do this project. Love it!
This is so beautiful. I will definitely be trying this project out. Thank you.
Wow, loving the big flower! Reposted via Twitter!
Thanks for sharing :O)
David
DSP
Hi! I really like this project :)
Can you please tell me where did you get your floral tape? I like it.
Thanks so much!
Referencing the photo with the first teardrop petal attached.. it doesn’t mention how far down the stem you attach, but it looks as if there is quite a bit of stem coming up in the middle of the flower? Any reason for this?
This may have been answered already but how many sheets of the flower colored crepe paper do you need to make 1 flower? (I can’t see all the text of the older comments) Thanks!
I LOVE these flowers. My wedding theme is Young at Heart and these fit in perfectly. I’m having a bit of a problem with the floral tape. It doesn’t stick very well. Is there an alternative tape which is similarly thin but stickier? Also, during which step is the floral tape cover stem covered in green crepe paper? Before the petals or after? Thank you!!
This is stunning and it seems easy to make, I’ve pinned it and added it to my diy wedding board.
So beautiful! I can’t wait to try this out. I featured this tutorial on my blog and linked back! Let me know if you want any of the info changed!
http://www.livecreativelynow.com/2012/05/great-flower-tutorials.html
Oh my goodness this is awesome! I’ve never seen anything like this!
We would LOVE for you to stop over and link these up in our Crafty Saturday Showcase. It is just our 2nd week. Your blog is cute and we can’t wait to look around some more! I love the name of your blog!
Thank you!
Susie @Bowdabra
http://bowdabrablog.com/2012/05/12/saturday-showcase-craft-projects/
I really really want to have this for my bouquet! Just got all my material but in step 3 with the tear drop pedals how far up does the stem go it looks like it goes up the pedal more then half way
Hey Brianna – you want to put the stem about half way (or slightly below) halfway on the petal – I feel like it’s sturdier when I do that than put stem around the base of the petal. Don’t worry about the stem showing through the top. Good luck!
LOVE THIS!
http://www.papermart.com/Product%20Pages/Product.aspx?GroupID=36623&SubGroupID=36547&ParentGroupID=28044#36547
Papermart has an awesome selection of crepe paper :)
Hi Nata,
We loved your wedding. I left a message on your other feedback with Green Wedding Shoes regarding your creative photo “non-booth”set up. My daughter is getting married in Laguna Beach on August 4th and we are building a photo wall, so people can stand behind it and take fun pictures. We would love to figure out the same kind of set-up that you used, so that we do not have to hire another photographer to man the equipment.
I would greatly appreciate hearing back from you on how to set up the printer, camera, etc. If your friend who designed the process would be interested in contacting us, I would also be so grateful. We just do not have the technolocial background to figure it all out!
Thank you so much. Your wedding photographs are fantastic and truly reflected your individual style and creative sensibilities.
I’ll look forward to hearing from you.
Fondly,
Leslie
[email protected]
I’m not sure I could make them but they look fab x
thank you so muchhhh for the idea!
it’ll be so great on birthdays or weddings or whatever events!! THANK YOU ! <33 you've brighten up my day
xoxo
Very inspiring! I plan to make them for my Studio. Thanks so much for sharing.
Like for real this is really amazing. and i love it so much.
Do these wilt over time? How far ahead can I make these?
Hey! I made them like 6 months ahead of time and they don’t wilt. Good luck@
Can you buy these pre made???
Can anyone tell me how to get the template to print at the right size… it says to enlarge it but when I do it prints on different pages
You’ll need to take it to a fed ex kinkos or lybrary a place with a xerox machine.
Wow, these are gorgeous!
oh my GOODNESS!! that flower is so beautiful! It totally looks real! Very nice!
I love these giant flowers. They have a surreal quality to them that really enhances the sense of fantasy for an event. Thanks for sharing this tutorial.
Awesome!!very creative,looks so real!Thanks for sharing.
Is Doublette Crepe Paper the only brand of crepe paper we should use? Additionally is there a template for the smaller flowers the bridesmaids are holding?
i hv been making this flower thank u for tutorial its beautiful
Wow! Those flowers are fantastic–and perfect for weddings (maybe kids, too?)!
Thanks for sharing. I’m visiting from OneCreativeMommy.com. (New Facebook follower)
nice flowers
this is really beautiful tips for making awesome flowers for friends and event, great share :)
Oh my GOD what a great creativity love your work it give me idea about by bridge thanks for sharing this great work
Beautiful x
I really love these flowers…I have seen this before when looking for paper flower and tissue papger flower tutorials….I wish I could talk my daughter in to using these for her wedding….
what is the Doublette crepe colors should i get on castleintheair.biz, i want the color like your
https://www.castleintheair.biz/shoppe/?b=10&k=10&c=143
Really inspiring craft !!! last week i have made some east paper roses for my greeting card.
i love to make this big rose now….
http://letscreatecrafts.com/magazine/
Love this and is in the process of making for my engagement pictures! One question tho…what size is the paper you use to cut out the petals? Are you putting 8.5X11 paper on top of the paper and stapling? What size are the petals? Please let me know!
Thanks!
Ok this is freaking amazing! I was trying to explain to a planning bride I know about utilizing gigantic flowers as reception decor, but the words didn’t come out right. After a quick search, I stumbled upon this post and immediately forwarded it to her. Thanks for inspiring! – Rudy
Did she take it then?
Love it. I want to use felt for my bouquets. I going to experiment in the next couple of weeks. I want big long fake flowers!
It is so beautyful !!! Thank you for your thecnique …
Paulette
How big is this–> https://greenweddingshoes.com/wp-content/uploads/2012/01/diy-giant-paper-rose-04.jpg heart?
These are beautiful flowers. I am going to feature a link to your post on my site. Thanks for sharing.
This is the best DIY I have seen ever.
Just so beautiful.. Many many thanks for sharing this amazing DIY.. Looking forward for more .. :)
God bless you.
This is such an awesome idea! :D I’ve included a link to your tutorial on my round-up of the 10 most gorgeous wedding craft ideas that are simple enough for kids to do. I hope you don’t mind!
Here’s the link: http://hodgepodgecraft.com/2013/08/top-10-wedding-craft-ideas-which-are-simple-enough-even-for-kids-to-do/
Wow! Never would have thought a single giant flower instead of a bouquet. This is gonna turn heads!
So adorable! Would love to have you feature a to-torial at http://www.unpind.com!
Email me if you’re interested.
Just gorgeous. thank you for giving me a wonderful idea for my wedding in April.
I am in the process of a test run making one of these for my wedding. I’m from Australia and can only get doublette crepe from the UK online, so am making my own – normal crepe paper x2 sheets joined together with spray adhesive. Is just as good and cheaper!
I also make flowers and headbands from tissue paper. Visit my blog: http://lemkinia.wordpress.com/
Wow these look cute stuff, very creative and amazing perfect for my party!
This is such a cute idea! I love it and would love to use some of my brighter colored tissue paper that i have in my stockpile. :)
Beautiful flower!!! And very original bridal bouquet!!
Bom dia! Gostaria de parabenizar pelo lindo trabalho com rosas em papel. Se possível envie pelo e – mail em português o modo de fazer e o material necessário, pois, não entendo bem o inglês. Vou fazer estas flores na minha escola, na festa da primavera. Desde já agradeço.
Roseli
Ipaba, Minas Gerais/ Brasil
Hey all just wondering about how long it takes to make each flower? Love the idea :)
Hi,
First of all, what a beautiful idea!
I want to make one of these for a gift and won’t be able to get the paper in time. Is there any other paper you would suggest that I could buy in a store? Instead of the crepe paper?
Now I know why my paper roses are stiff. Thanks for sharing this.
This is so artsy. Love this!
Nice Tutorial. We can try this.
Hi!
Where can I get the templates for the giant flower DIY?
Wow this is so fun! I’ve never seen something so cool and unique. It fits for wedding and other occasions. so fun :)
Beautiful creativity,,..
I love this! Thank you for the great tut!
Beautiful craft art. i love it.
How i just wish i will have this time to this. I just so much love it.
http://www.dailiesroom.com/memorable-christmas-poems-for-friends-family-and-love-once/
Wow, I never thought that art & craft looks so amazing. Really Surprised.
It is so beautyful !!! Thank you for your thecnique …
Paulette http://www.geomedicals.com/
Beautiful flower!!! And very original bridal bouquet!! great site!!!
I love this! Thank you for the great tut i love this awesome tips…
Awesome! Those are some huge flowers.
Creates a fantastic color and texture as well. And doesn’t fade throughout the wedding. Always looking for an alternative to live flowers. Thanks
This diy rose will tug our 5 stars in my marriage port folio..thanks a lot for this amazing craft..will visit you for more like this in future.
Hey all just wondering about how long it takes to make each flower? Love the idea :)
Really beautiful craft! last week I have made some paper roses for my greeting card.
I love to make this big rose now.
Ok this is freaking amazing! I was trying to explain to a planning bride I know about utilizing gigantic flowers as reception decor, but the words didn’t come out right. After a quick search, I stumbled upon this post and immediately forwarded it to her. Thanks for inspiring me and my buddy, great content
Really inspiring craft !!! last week i have made some east paper roses for my greeting card.
i love to make this big rose now….
nice concept
Nice post you have got here, I stumbled on your Instagram page @greenweddingshoes while writing my blog post white theme ideas for Instagram accounts http://hillsay.com/white-themed-instagram-accounts-ideas-tips-follow/, yours was exceptionally great. Am loving you guys choice of fashion.
Not forgetting the awesome guide to make a giant paper rose you have put here.
Thanks for sharing!
A great idea, creating such a decoration requires a lot of practice :) I admire :)
Really beautiful craft! last week I have made some paper Cakes for my greeting card.
I love to make this big Cake now.
Hey,
I noticed your article and read it. I just loved the way you wrote.
Thanks for the given article.
Best rose flower i found here. thanks
I appreciate your hard work for creating such beautiful and artistic DIY designs using colorful sheets/paper. Your support and guidance have helped me a lot in learning the new designs and implementing the new thoughts for art and craft. Your thoughts are amazing and unique. I love the inspiring idea of creating flowers for making the wedding day special from tissue balls that are cost-effective and are available in different colors and styles. Your teaching skills are also very easy by stating the process step by step. I am very excited to learn to create more handmade artistic designs and improve my innovative skills as well.
Wonderful post, beautiful design. I am going to try this at home.
Cool Never have thought a single flower instead of a bouquet. Where can I get the templates
Great job People. I love flowers so much
Cool Never have thought a single flower instead of a bouquet. Where can I get the templates
Cool Never have thought a single flower
instead of a bouquet. Where can I get the templates
I am in love with this
Very nice post
https://donowlearningg.blogspot.com
What a great way to start my day. This is awesome and the best I have seen online today. Please keep adding valuable content like this. Cheers.
Awesome article. Crepe paper is amazing.