
I have the cutest (and pretty easy to make!) burlap boutonniere DIY to share with you guys today! Created by reader Suzannah of the blog, Adventures in Dressmaking, Suzannah was sweet enough to send this over to me to share with you all! Perfect for any of you having a rustic wedding – and a great way to save some money!

• Burlap
• Cereal box-weight cardboard
• Three kinds of buttons, one of each on each boutonniere
• Two kinds of feathers
• Pin backs
• Natural jewelry cord
• Elmer’s Glue
• Hot glue gun
• 3/4″ wide ribbon
• Embroidery floss and big needle (optional)
• Sturdy bamboo skewers

First you’ll need to cut leaf shapes out of the cardboard. Trace with pencil the shape you want, and once you get what you like, cut out one teardrop per boutonniere.

Use a cardboard teardrop as a pattern and cut out burlap shapes, one for each boutonniere. Be approximate – no need to be exact at this point.

Put a little Elmer’s Glue on each cardboard piece (the natural-colored side) and glue the burlap down. Let dry a minute or so then trim off the remaining fabric (as seen below).


If you’d like to give the boutonniere more depth, get out the cardboard again (or use regular paper) and make a pattern piece for a slightly larger leaf. The original doesn’t have this – it’s optional, of course! Cut out a larger burlap teardrop for each boutonniere, using your new pattern.

We now have nine big burlap teardrops and nine cardboard-backed smaller teardrops.

Now for the sticks. Measure your skewers to 3.75″ or so, score them with scissors, and break. Make one per boutonniere. Glue each stick to the center of each cardboard-backed teardrop with hot glue.

Wrap the jewelry cord around the leaf stem, starting by gluing the end to the bottom of the stick (not really shown… sorry). I recommend one thin line of hot glue, up one side of the stick, and do only an inch or so at a time since the glue will cool before you get to the top! Glue the loose end down onto the front (burlap side) of the leaf.

Now to make the cute ribbon bows! Some ribbons come already with cute running stitch detailing on the edges, but we wanted to make our own. :) For 3/4″ wide ribbon, you’ll need about 11″ from the center of the ribbon longways to the center on the other end. Cut the ribbon with a slant cut. Using a big needle, do a running stitch down each ribbon piece. Cut off the end of the embroider floss after you finish sewing each piece. They will be bumpy so you can flatten them as much as possible, pulling on them with your fingers. Tie into bows!

Now back to base pieces. Glue your first layer of feathers down – for us, that’s the puffy white ones. Now, you’ll glue on the top layer of feathers – these polka dot ones are so cute!!

Now you should have all the piece and it’s time to glue everything down. Start by gluing on the bows.

I recommend putting a tiny drop of hot glue inside the bow to keep it tied. Now glue the buttons on. You can overlap them a little if you want. Glue the larger burlap teardrop shapes onto the cardboard sides of the main teardrops. We liked the extra depth this bigger back piece gave, and it covers the cardboard and makes the whole thing a little bigger but not floppy. Now, glue the pin back pieces on to the backs of the teardrops. We put ours at a slight angle so that the leaf shapes would tilt a little on the lapels. You are done! :)

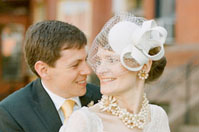
Top photo by pobke photography. All other photos and DIY created by Suzannah of Adventures in Dressmaking.
cool! i love it with the touch of the spotted feather!
What a lovely idea!!
xo
http://www.PlumPrettySugar.blogspot.com
Super cute!!
How sweet!
great tutorial! i love that it explains everything in text and with pictures to really help out! I might try this because of the security of great direction!
I LOVE the DIY articles! Thank you!
Such a great tutorial! And the results are so charming and unique. Thanks!
What a great idea. You can have these all custom for each wedding.. I’m going to suggest this to my future brides.. great tutorial…
These can all be very special for each groom, and then they can keep it as a memoir.
May I ask where did you find the feathers…I went to my local Michael’s to look for some fashionable feathers…but no luck there….
LOVE the idea of making your own boutonnieres! They are so unique and stylish! Def doing this for my wedding. Thanks for all the tips!
I love it, is super original! An artist!
Thanks for sharing the idea with us! DIY weddings are all the rage right now. Low cost and lovely!
very creative! love the ribbons :)
Omgosh…luv it!
Glad you like the tutorial!!
@Nancy, we got the feathers at JoAnnn near the kid/mask/glue gun section! =)
Love this diy! Love incorporating the natural elements of burlap, twine, feathers and buttons. Thanks for sharing!
Hi there! The original top image by Pobke Photography and design was the buttonaires I designed for my own wedding in November 2011.
The only changes I used to create the originals was two layers of hessian held together with visa fix (which creates a seamless finish and allows you to fray the ends however much you wish) and thin wire, instead of sticks as the stem.
I also used ribbon which was already embroidered – our groomsmen had the shown ribbon and my groom had lace.
I also created two buttonaires for our fathers with ribbons and buttons to match the colours of our mothers dress – they loved it!
You can see more images of them here on our photographers website:
http://www.pobkephotography.com/blog/canberra-wedding-photographer/katie-morgan-sydney-wedding-photography/
Katie
oh and I had matching buttons to my groom in my hand made hair piece (and cake) – another fun way to match your accessories :)
Just to let you know, I recently used these for my wedding, which was featured on My Fair Wedding with David Tutera… and he LOVED them! :) I also posted a link to your site http://chicrunner.com/2012/01/qa-about-our-wedding/ as well, since so many people asked me where I got the idea, now that the show has aired. He loved them so much, he kept them and added a little flower to the boys boutonnieres. :) Thanks for this easy, great idea!
This was so simple I could do it drunk – literally. Hallelujah, people who work out how to explain complicated stuff in an easy manner, you are the masters. This is a rare skill.
It looked exactly the same. Respect.
Love this boutonniere! I’m definitely going to make these for our wedding and cant wait to try it out! I’m wondering what size are each of the leaves? im having a hard time figuring out how big i should make them.
These are beautiful! I never thought to use cardboard to support the burlap. These would look nice with some small cotton too.